Sequence Aware Peptide Stability in Solution, Verified by HPLC/MS
Yes. Many peptides remain stable in aqueous solution when you control pH, select a compatible buffer and excipient system, exclude oxygen, keep the sample cold and aliquoted, and confirm results with stability-indicating HPLC or LC-MS. Which degradation pathway threatens a given peptide most depends on its sequence, so the formulation choices below only work when you know what you’re defending against.
TL;DR:
- Peptides are most vulnerable to degradation through hydrolysis and deamidation if stored at neutral or alkaline pH, especially above pH 6 or with Asp-Gly motifs.
- Screening for sequence motifs like Asn-Gly and assessing oxidation-prone residues early helps tailor formulation conditions to prevent specific degradation pathways.
- Using buffers like acetate or citrate within pH 3 to 6, combined with oxygen exclusion, chelators, and appropriate excipients, optimizes stability based on the identified risk factors.
- Lyophilized powder stored at long-term conditions (−20°C or lower) remains more stable than reconstituted solutions, which should be aliquoted, sealed, and used promptly to minimize degradation.
- Independent lab testing for purity and degradation pathways ensures formulation decisions are based on verified data, avoiding issues from vendor-reported purity overestimation.
Table of Contents
- What Determines Peptide Stability in Solution
- How to Screen a Peptide Sequence for Instability Risk
- Choosing the Right pH and Buffer System
- Excipients That Protect Peptides From Chemical and Physical Attack
- Storing Peptide Solutions and Lyophilized Powder Correctly
- Solubility Is Not the Same as Stability
- Designing a Stability Study With the Right Analytical Methods
- A Stepwise Protocol for Preparing and Storing Peptide Stock
- Why Independent Lab Testing Confirms Formulation Choices Actually Work
- Ionic Strength and Salt Selection in Peptide Formulations
- Dissolved Oxygen, Inert Gas, and Oxidative Stability
- Metal Ions, Chelators, and Trace-Metal Contamination
- Modeling Degradation Kinetics to Predict Shelf Life
- A Practitioner’s Take on Formulating for Stability
- Verify Your Peptide’s Purity Before You Trust Its Stability Data
- Sources
- FAQ
What Determines Peptide Stability in Solution
Peptide stability in solution comes down to five degradation pathways, and almost every failed formulation traces back to one of them going unaddressed. Hydrolysis, deamidation, oxidation, aggregation, and adsorption each attack the molecule differently, and each has its own pH and temperature fingerprint. Knowing which one your peptide is vulnerable to, before you pick a buffer, saves weeks of trial and error.
Hydrolysis breaks peptide bonds through water attack, and it accelerates sharply outside a narrow pH window. Aspartate-containing sequences are especially exposed, since the side-chain carboxyl can catalyze backbone cleavage at the adjacent bond, a reaction that speeds up as pH climbs above 6.
Deamidation converts asparagine or glutamine residues into aspartate or isoaspartate, altering charge and sometimes bioactivity. Asn-Gly motifs are the classic hot spot because the small glycine side chain lets the backbone fold into the conformation deamidation requires. This pathway is famously pH-sensitive: it slows in mildly acidic conditions and speeds up as the solution turns alkaline, which is one reason supplier guidance recommends avoiding prolonged exposure above pH 8.
Oxidation targets methionine, cysteine, and tryptophan. Methionine sulfoxide formation is often the first sign something’s wrong on an LC-MS trace, showing up as a mass shift of +16 Da. Cysteine-containing peptides face an added risk: disulfide scrambling, which can drive aggregation as a side effect of oxidation rather than a separate event.
Aggregation is physical rather than chemical, but it’s frequently triggered by chemical damage. A deamidated or oxidized peptide often has a slightly different surface charge or hydrophobic profile, which is enough to nucleate a dimer, then a higher-order aggregate. Concentration, ionic strength, and freeze-thaw cycling all push this process forward.
Adsorption is the pathway bench scientists overlook most often. Peptides, particularly small, hydrophobic, or low-concentration ones, can lose a meaningful fraction of total mass to the walls of glass vials or plastic pipette tips. This shows up as an unexplained drop in HPLC peak area with no corresponding degradation product, which is to tell that distinguishes it from true chemical loss.
Five pathways worth tracking on every new peptide:
- Hydrolysis: backbone cleavage, worsens above neutral pH, watch Asp-X bonds.
- Deamidation: Asn/Gln side-chain conversion, accelerates in alkaline conditions, Asn-Gly is highest risk.
- Oxidation: Met, Cys, Trp side-chain attack, driven by dissolved oxygen and light, shows as +16 Da shifts on MS.
- Aggregation: physical self-association, often secondary to chemical damage, worsens with concentration and freeze-thaw stress.
- Adsorption: surface loss to vial or tubing walls, most severe for dilute, hydrophobic sequences.
How to Screen a Peptide Sequence for Instability Risk
A five-minute sequence review before formulation work starts tells you more than most people expect. Run through these checks before touching a buffer.
- Scan for deamidation motifs. Flag any Asn-Gly, Asn-Ser, or Asp-Gly pairing, and pay close attention to an N-terminal glutamine, which can cyclize into pyroglutamate on its own even without enzymatic help. A peptide like pGlu-Glu-Pro amide illustrates how a pyroglutamate cap changes a sequence’s degradation profile compared to a free N-terminal glutamine.
- Locate oxidation-prone residues. Count methionine, cysteine, and tryptophan residues and note their position. Surface-exposed residues near the termini oxidize faster than those buried in a folded or amphipathic segment.
- Calculate the isoelectric point (pI) and net charge at your intended pH. A peptide sitting close to its pI has minimal net charge, which reduces the electrostatic repulsion that normally keeps molecules apart in solution, raising aggregation risk.
- Check for hydrophobic clustering. Long hydrophobic stretches, especially without a compensating charged residue, tend to self-associate and adsorb to plastic more aggressively.
- Run a small forced-degradation pilot. A pH sweep (three or four buffers spanning pH 3 to 8), a peroxide spike for oxidative stress, and a brief agitation or shaking stress test will surface the dominant pathway within a few days, well before committing to a full formulation program.
This sequence-first approach mirrors the logic behind comprehensive formulation-strategy reviews, which treat pH and buffer screening as the starting point rather than an afterthought.
Choosing the Right pH and Buffer System
pH is the single highest-leverage variable in peptide formulation, and it’s the first thing to nail down before touching any excipient. Most peptides show a stability window between roughly pH 3 and 6, where deamidation slows and hydrolysis rates drop, though this range is illustrative rather than universal. Some sequences tolerate a wider band; others narrow sharply around a specific value tied to a sensitive residue.
General pH guidance. If your peptide contains Asn-Gly motifs or multiple Asn/Gln residues, lean toward the lower end of that window, closer to pH 4, to suppress deamidation kinetics. If oxidation is the dominant threat instead, pH has a smaller direct effect, and you’ll get more mileage from oxygen exclusion and antioxidant excipients than from further pH tuning.
Buffer species matter beyond pH. Acetate, citrate, phosphate, and amino-acid buffers (histidine, glycine) don’t behave identically even at the same pH value. Buffer-peptide interactions can shift conformational stability in ways that are sequence-specific rather than universal. Citrate has been shown to improve oxytocin stability under certain conditions, while octreotide’s stability profile shifts measurably between acetate and citrate systems. That means you can’t assume one buffer choice will transfer cleanly from one peptide to the next, even within a related therapeutic class.
- Acetate buffers work well in the pH 3.5 to 5.5 range and are generally low-cost and well-tolerated, but they can promote certain metal-catalyzed oxidation pathways if trace metals are present.
- Citrate buffers extend usable range slightly higher and have chelating properties that can help suppress metal-catalyzed oxidation, though citrate’s own carboxyl groups can occasionally interact with basic residues.
- Phosphate buffers are common in the neutral range but can precipitate with calcium or other divalent cations, an easy-to-miss compatibility problem in multi-component formulations.
- Amino-acid buffers like histidine offer buffering capacity near physiological pH with generally favorable protein and peptide compatibility, though they add cost and formulation complexity.
Co-solvents change the picture too. Glycerol, propylene glycol, and low-percentage ethanol lower the solution’s dielectric constant, which can reduce hydrolysis rates and improve solubility for hydrophobic sequences. The trade-off is viscosity and, in some cases, altered injectability or handling characteristics, so co-solvent levels need bench testing rather than a default percentage.
Ionic strength and counterion choice round out the buffer conversation. High ionic strength can screen the electrostatic repulsion that keeps charged peptides apart in solution, which sometimes helps solubility but can also promote aggregation once that repulsive barrier drops. Counterion choice (acetate salt versus trifluoroacetate salt, for instance) can shift both solubility and degradation kinetics independently of the buffer you add afterward.
Pro Tip: Run your pH screen and your forced-oxidation screen in parallel, not sequentially. A buffer that looks perfect for deamidation control can quietly accelerate oxidation if it contains trace transition metals, and you won’t catch that unless both stress conditions run side by side.
Excipients That Protect Peptides From Chemical and Physical Attack
Once pH and buffer are locked in, excipients do the finer work of blocking specific degradation routes. Each excipient class targets a different failure mode, and layering the wrong one onto the wrong peptide wastes formulation time.
Sugars and polyols (sucrose, trehalose, sorbitol, mannitol) work by preferential exclusion: they get pushed away from the peptide surface, which raises the energetic cost of unfolding or aggregating. Trehalose is particularly effective at protecting against freeze-thaw stress and is commonly tested in the 1% to 10% w/v range, though the right concentration depends on the peptide’s own aggregation propensity and the formulation’s tonicity requirements.
Surfactants like polysorbate 20 and polysorbate 80 block a different mechanism: interface-driven aggregation at the air-water or container-wall interface. Even trace surfactant, often below 0.1%, can dramatically cut adsorption losses for hydrophobic peptides. The catch is quality control. Polysorbates degrade over time into peroxide and formaldehyde-generating species, which can introduce a new oxidative stress into a formulation meant to prevent one. Lot-to-lot polysorbate quality checks are not optional if oxidation-sensitive residues are present.
Viscosity enhancers and polymers, including polyvinylpyrrolidone (PVP) and polymeric surfactants like Pluronic F68 (poloxamer 407), slow degradation by physically restricting molecular mobility. Poloxamer 407 has been reported to slow asparagine deamidation in model peptides, likely by altering local water activity and solvent exposure around the vulnerable residue. The trade-off is straightforward: higher viscosity can affect syringeability and administration comfort, so any viscosity-based strategy needs early testing against your actual delivery format.
PEGylation attaches polyethylene glycol chains to the peptide backbone, extending circulation half-life and often improving solution stability by shielding vulnerable residues from solvent contact. The trade-off is real: PEGylation changes the molecule’s pharmacokinetics and bioactivity profile, sometimes significantly, and it adds a manufacturing step with its own quality-control burden. It’s a strategy for peptides where other tactics haven’t solved the stability problem, not a default first move.
Hydrophobic ion pairing (HIP) pairs a charged peptide with an oppositely charged hydrophobic counterion, forming a complex that shields the peptide’s reactive charged residues and can reduce both deamidation and aggregation. HIP works by altering solvent exposure at the charged residue itself, which is why it tends to help most on sequences where the sequence-screening step flagged an exposed, reactive charged residue near a deamidation-prone motif. Test HIP when simpler buffer and excipient changes haven’t moved the needle enough.
Quick reference for excipient selection by failure mode:
- Aggregation risk: sugars/polyols (trehalose, sucrose) plus a low-level surfactant.
- Interface adsorption: polysorbate 20/80 at low concentration, with polysorbate quality verified by lot.
- Deamidation risk: viscosity enhancers (PVP, poloxamer 407) or HIP if a charged residue sits near the motif.
- Oxidation risk: oxygen exclusion first, chelators second, PEGylation only if residue shielding is otherwise insufficient.
- Adsorption to surfaces: surfactant plus low-binding container selection (see storage section below).
Storing Peptide Solutions and Lyophilized Powder Correctly
The storage decision starts before you dissolve anything: lyophilized powder is almost always more stable long-term than the reconstituted solution, because removing water shuts down hydrolysis and slows most other degradation kinetics dramatically. Keep peptides lyophilized until shortly before use whenever your workflow allows it.
- Store lyophilized peptide at −20°C or −80°C. Supplier technical guidance recommends this temperature range for maximum shelf life before reconstitution, with desiccated, sealed storage to prevent moisture uptake.
- Aliquot immediately after reconstitution. Divide the working solution into single-use volumes before freezing, so no vial goes through more than one freeze-thaw cycle. Each freeze-thaw event mechanically stresses the peptide at the ice-water interface, a known driver of aggregation.
- Choose low-binding containers. Polypropylene tubes with low protein-binding surfaces cut adsorption losses compared to standard polystyrene, especially for dilute or hydrophobic peptides.
- Minimize headspace and consider inert gas. Filling vials close to capacity limits the air-liquid interface available for oxidation and adsorption; purging headspace with nitrogen or argon before sealing adds another layer of protection for oxidation-sensitive sequences.
- Set a defined in-use hold time and stick to it. Reconstituted peptides commonly hold at refrigerator temperature for a limited window and longer when kept frozen, but the safe window varies by sequence and formulation, so verify it with your own stability data rather than assuming a blanket number applies.
Solubility Is Not the Same as Stability
A peptide dissolving cleanly into solution tells you almost nothing about whether it will still be intact a week later. Solubility and stability are distinct properties: a clear, particulate-free solution can still be actively degrading through hydrolysis or deamidation with no visible sign until an HPLC trace shows a shrinking parent peak and a growing degradation product.
Concentration compounds this. Pushing a peptide to higher concentration to reduce injection volume or dosing frequency often increases the collision frequency between molecules, raising aggregation risk even when the chemistry (pH, buffer, oxidation exposure) stays identical. Ionic strength interacts with this too: conditions that improve initial solubility can simultaneously destabilize the peptide by altering the electrostatic repulsion that keeps molecules apart in dilute solution.
Practical checks worth building into every new formulation:
- Test solubility and stability separately, and always record concentration, buffer, temperature, and observation window rather than reporting a bare “soluble” claim.
- Confirm compatibility with the actual diluent and delivery device you’ll use in practice, not just water, since plastic components in an infusion set or syringe can adsorb peptide differently than a glass vial.
- Document every compatibility result with a timestamp and analytical method, so a stability claim can be traced back to the exact conditions that produced it.
Designing a Stability Study With the Right Analytical Methods
A defensible stability claim rests on assays that can actually detect degradation, not just confirm the peptide is present. Three methods form the core of most stability-indicating programs.
Reverse-phase HPLC with UV detection remains the workhorse for potency (assay) and impurity quantification. A well-developed method separates the parent peptide from its degradation products, so a shrinking main peak alongside a growing shoulder peak is the first sign of trouble, often visible before any physical change is apparent.
LC-MS identifies exactly what changed. A +16 Da shift flags methionine oxidation; a +1 Da shift consistent with deamidation’s mass change, confirmed by peptide mapping, distinguishes deamidation from other modifications that HPLC alone can’t separate cleanly. This is the method that turns “something degraded” into “residue 12 oxidized.”
SEC and DLS cover the physical side. Size-exclusion chromatography quantifies soluble aggregates and fragments; dynamic light scattering catches early-stage aggregation, sometimes before it’s visible as haze or particulates.
A minimal but meaningful forced-degradation matrix covers four stresses: acidic pH, basic pH, oxidative stress (peroxide spike), and thermal stress (accelerated storage at an elevated temperature). Running the peptide through all four and analyzing timepoints with HPLC and LC-MS reveals which pathway dominates for that specific sequence, exactly the sequence-specific answer that generic stability guidance can’t give you.
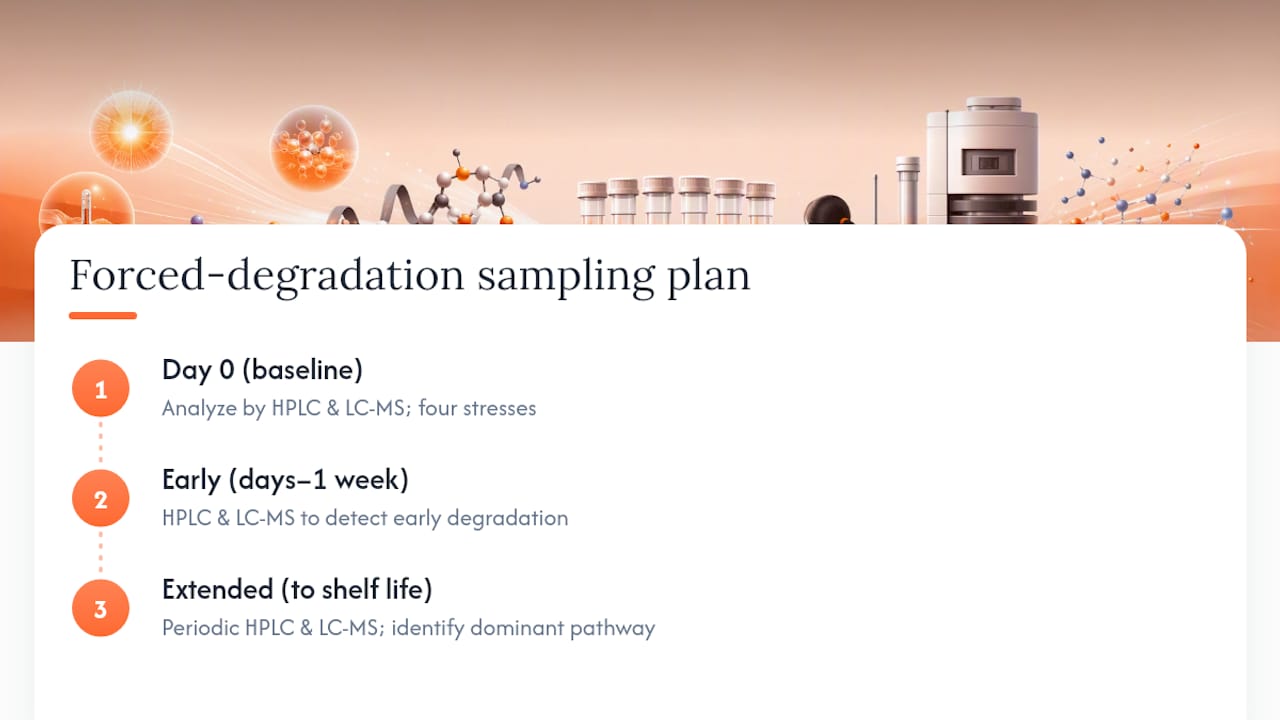
Sampling plans should include a real-time condition (typically 4°C or the intended storage temperature) alongside at least one accelerated condition, with timepoints at day 0, an early check (a few days to a week in), and extended intervals out to your target shelf life. Independent third-party HPLC and LC-MS testing gives labs a way to verify these results without relying solely on a vendor’s own certificate of analysis, which matters when a formulation decision or a purchasing decision rides on the purity number.
A Stepwise Protocol for Preparing and Storing Peptide Stock
Handling errors cause more early degradation than formulation mistakes do. Follow this sequence every time a new peptide comes off the shelf.
- Review the certificate of analysis before opening the vial, and confirm identity, purity, and counterion form match what you ordered.
- Select your diluent and buffer based on the sequence screen from earlier in this guide, not a default choice.
- Reconstitute gently. Add diluent slowly down the vial wall, swirl rather than vortex, and avoid excess agitation that can nucleate aggregation at the air-liquid interface.
- Control temperature during dissolution. Room temperature is fine for most peptides; avoid warming to “speed things up,” which can accelerate hydrolysis before the peptide is even in final form.
- Filter if particulates are visible, using a low-protein-binding filter to avoid losing peptide mass to the filter membrane itself.
- Run a first QC check with HPLC before committing the batch to long-term storage, confirming the reconstituted material matches expected purity.
- Aliquot, label with date and concentration, and freeze immediately in single-use volumes.
- Set a discard rule for any aliquot that has been thawed once, and never refreeze a used aliquot for later use.
Pro Tip: Label every aliquot with the reconstitution date, not just the peptide name. When a stability question comes up three weeks later, “how long has this actually been in solution” is the first thing you’ll need to know, and it’s the detail everyone forgets to write down.
Why Independent Lab Testing Confirms Formulation Choices Actually Work
A stability claim is only as good as the analytics behind it, which is why independent verification matters more in peptide research than almost anywhere else in the supply chain. A proper HPLC and mass spectrometry report covers four things: identity confirmation (does the mass match the expected sequence), assay value (how much active peptide is actually present), impurity profile (what degradation products or synthesis byproducts are there and at what level), and lot traceability back to a specific manufacturing batch.
Boren Health’s independent testing service applies this same analytical rigor to vendor-sourced peptides, giving researchers a lab-verified purity and identity result that doesn’t depend on a vendor’s own internal certificate. That distinction matters because vendor-reported purity and third-party-verified purity don’t always agree, and a formulation built on an inflated purity number will show unexpected degradation kinetics that have nothing to do with the buffer or excipients chosen. Cross-referencing a vendor purity comparison against your own forced-degradation data closes that gap before it costs a formulation cycle.
Ionic Strength and Salt Selection in Peptide Formulations
Salt concentration changes peptide behavior in solution through electrostatic screening, and the effect can run in either direction depending on the peptide. Adding salt reduces the electrostatic repulsion between charged peptide molecules, which can improve solubility for a peptide that’s aggregating due to like-charge clustering. The same screening effect can also remove the repulsive barrier that was keeping molecules apart, tipping a borderline-stable formulation toward aggregation.
Peptides with a high net charge at formulation pH tend to be most sensitive to ionic strength changes, since their stability often depends heavily on charge repulsion in the first place. A peptide sitting close to neutral net charge is less affected by salt concentration changes because there’s less electrostatic effect to screen out.
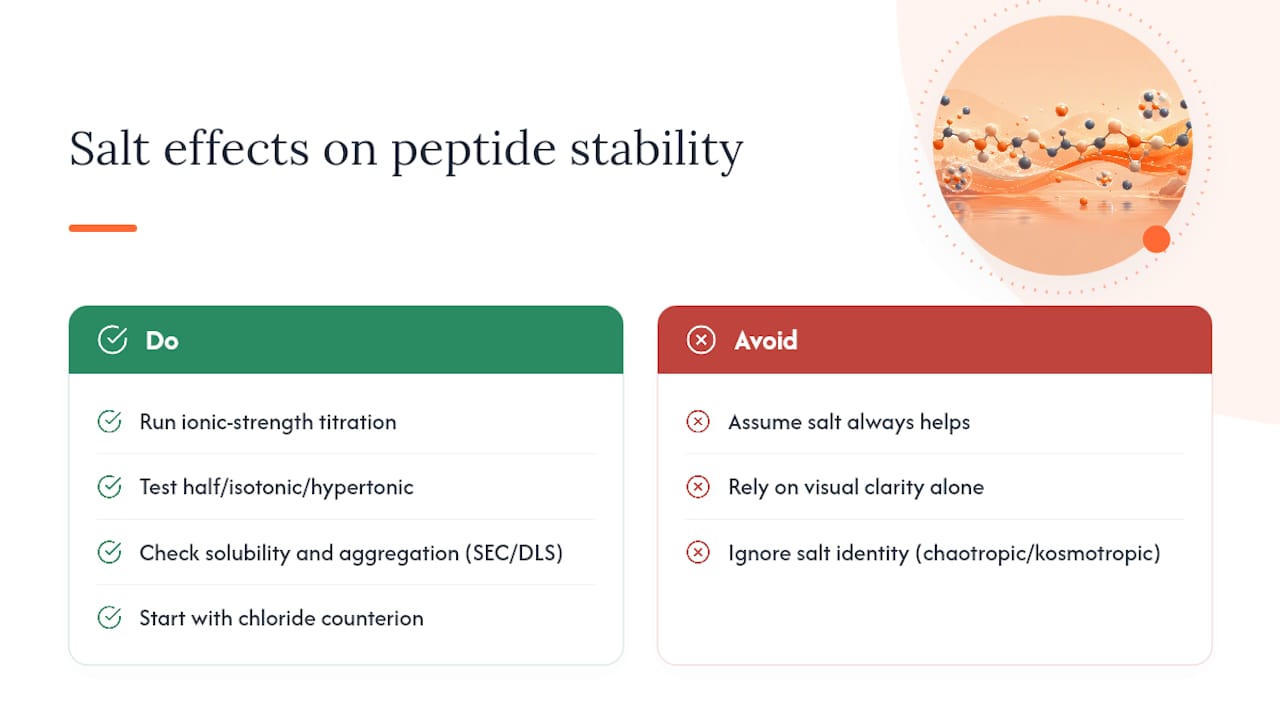
Salt type, not just concentration, matters too. Chaotropic salts (like thiocyanate or iodide) tend to destabilize peptide structure and promote unfolding, while kosmotropic salts (like sulfate) generally stabilize compact conformations, a pattern broadly consistent with the Hofmeister series. Chloride sits in between and is the most common counterion in practice, which is one reason it’s the default starting point for most formulations before more targeted salt screening begins.
The practical takeaway: never assume “add salt for solubility” is a free move. Run a small ionic-strength titration (isotonic, half-isotonic, hypertonic) alongside your pH screen, and check both solubility and aggregation by SEC or DLS at each point, since the same sample that looks perfectly clear can be aggregating in a way that’s invisible to the naked eye.
Dissolved Oxygen, Inert Gas, and Oxidative Stability
Dissolved oxygen is often the most underestimated threat to a peptide containing methionine, cysteine, or tryptophan, largely because it works silently. A sealed vial with normal headspace air contains more than enough dissolved and gas-phase oxygen to drive measurable oxidation over weeks of storage, especially at room temperature or under light exposure.
Light accelerates oxidation for tryptophan-containing peptides specifically, since tryptophan’s indole ring absorbs UV light and can generate reactive oxygen species locally. Amber vials or foil wrapping are a low-cost, easy fix that gets skipped surprisingly often in bench workflows.
Inert gas overlay, purging the headspace above the solution with nitrogen or argon before sealing, directly reduces the oxygen available to react with vulnerable residues. This is standard practice in pharmaceutical peptide manufacturing and translates well to bench-scale research work: a simple nitrogen purge line and a needle through a septum cap is enough to meaningfully cut headspace oxygen in a research vial.
Chelators and antioxidants complement gas exclusion rather than replace it. Metal ions can catalyze oxidation even at trace levels, so combining oxygen exclusion with a chelator (covered next) gives layered protection instead of relying on a single control point. For methionine-rich sequences specifically, treat oxygen exclusion as a first-tier control, on par with pH selection, rather than an optional extra.
Metal Ions, Chelators, and Trace-Metal Contamination
Trace metal contamination is one of the least visible causes of peptide degradation, because the metal ions responsible are often present at parts-per-billion levels in “pure” water, glassware, or even buffer salts themselves. Transition metals like iron, copper, and zinc catalyze oxidative reactions at methionine, cysteine, and histidine residues through Fenton-type chemistry, generating reactive oxygen species that wouldn’t form at a meaningful rate without the metal present.
This is one reason buffer choice and oxidation risk are linked rather than separate decisions. A buffer contaminated with trace iron can undermine an otherwise well-designed formulation, which is why lot-to-lot buffer quality checks matter more for oxidation-sensitive peptides than for hydrolysis-prone ones.
Chelating agents, most commonly EDTA or DTPA at low millimolar concentrations, bind free metal ions and remove them from the reaction. Citrate buffer offers a secondary benefit here too, since its own carboxyl groups have some chelating capacity, which is part of why it can outperform acetate for certain oxidation-prone peptides even at matched pH.
The practical move is to test a chelator addition specifically when your sequence screen flags methionine, cysteine, or tryptophan and your forced-oxidation pilot shows faster-than-expected degradation. Adding a chelator to a peptide with no oxidation-prone residues does nothing useful and just adds formulation complexity for no benefit.
Modeling Degradation Kinetics to Predict Shelf Life
Most peptide degradation pathways follow first-order or pseudo-first-order kinetics, meaning the rate of loss is proportional to the amount of peptide still present. That relationship lets researchers run accelerated stability studies at elevated temperature and extrapolate back to real-time storage conditions using the Arrhenius equation, which links reaction rate to temperature through an activation energy term.
In practice, this means running your forced-degradation samples at two or three elevated temperatures (say, 25°C, 40°C, and 50°C) alongside the real-time storage condition, then plotting the log of remaining potency against time at each temperature. The slope gives you a degradation rate constant at each temperature, and plotting those rate constants against inverse temperature (an Arrhenius plot) lets you extrapolate a predicted rate at your actual storage temperature.
This approach has real limits worth respecting. Arrhenius modeling assumes the degradation mechanism stays the same across the temperature range tested, which isn’t always true. A peptide that degrades primarily through hydrolysis at 25°C might show a different dominant pathway at 50°C, especially if oxidation or aggregation kinetics respond differently to heat than hydrolysis does. Treat an Arrhenius-based shelf-life prediction as a well-reasoned estimate that still needs real-time confirmation, not a substitute for it.
The practical output of this modeling is a defined expiry or retest date backed by an actual degradation curve, rather than a generic assumption carried over from a different peptide or a different formulation.
A Practitioner’s Take on Formulating for Stability
Generic stability rules fail more often than they help, because they average across sequences that don’t behave the same way. A peptide flagged for deamidation and one flagged for oxidation need opposite priorities, and a blanket “keep it cold and slightly acidic” recommendation misses that distinction entirely.
Run the pH screen and an oxidation screen together, early, and pair both with HPLC and LC-MS rather than trusting visual clarity. Then build a storage strategy around what the cold chain in your lab can actually sustain, not an idealized protocol that assumes a −80°C freezer sits next to every bench. The formulation that survives contact with your actual workflow beats the one that only works on paper.
— Ross
Verify Your Peptide’s Purity Before You Trust Its Stability Data
A formulation strategy is only as reliable as the peptide you started with. If the vendor’s certificate of analysis overstates purity, every stability calculation built on top of it is wrong before you even start the pH screen. There are platforms that provide independent HPLC and mass spectrometry testing data across peptide vendors, along with real-time pricing and lab-confirmed purity data researchers can check before committing a batch to formulation work.
Submitting a sample through Test My Peptide Sample gets you an independent identity, assay, and impurity report you can cross-check against a vendor’s own claims, whether you’re working with Tirzepatide, Semaglutide, or a research peptide with no established track record. Pair that with the vendor comparison rankings before your next purchase, so purity assumptions get tested before they become the foundation of a stability study, not after.
Sources
- Designing Formulation Strategies for Enhanced Stability of Therapeutic Peptides in Aqueous Solutions: A Review
- Peptide Solubility: Formulation, Aggregation, and Quality | PepGuide
- Peptide stability and potential degradation pathways (Sigma-Aldrich technical article)
FAQ
Do Peptides Degrade if Left Unrefrigerated?
Yes, most peptides degrade faster at room temperature than under refrigeration, because hydrolysis, deamidation, and oxidation all speed up as temperature rises. The degree of risk depends on the specific sequence and how long the exposure lasts, so a brief room-temperature window during handling is far less concerning than extended unrefrigerated storage.
How Long Can Reconstituted Peptides Stay Unrefrigerated?
This varies significantly by sequence and formulation, and there’s no single safe number that applies across all peptides. As a general rule, minimize room-temperature exposure to the time needed for handling and dosing, then return the solution to refrigerated or frozen storage immediately, confirming actual hold times with stability-indicating HPLC data for your specific peptide.
How Long Can You Store Peptides Before Reconstituting Them?
Lyophilized peptide stored at −20°C or −80°C generally holds far longer than reconstituted solution, since removing water slows hydrolysis and most other degradation pathways. Keep peptide in lyophilized form until shortly before use whenever your workflow permits it.
What Determines a Peptide’s Shelf Life in Solution?
Shelf life in solution depends on sequence-specific vulnerabilities (which residues are present), the buffer and pH chosen, oxygen exposure, and storage temperature, not a fixed timeline that applies to every peptide equally. The only reliable way to establish a real shelf life is a stability-indicating study using HPLC and LC-MS across defined storage conditions, which is why independent lab verification matters before relying on a general estimate.
Does Freezing and Thawing Damage Peptide Solutions?
Yes, repeated freeze-thaw cycles stress peptides at the ice-water interface and can promote aggregation, even when the chemistry otherwise looks stable. Aliquoting solutions into single-use volumes before the first freeze avoids this entirely, since each vial then only goes through one freeze-thaw event before use.